background

Wednesday, October 19, 2011

Tooth Pillow

My six year old boy finally has his first loose tooth!  He found out because his new friend wanted to play, "a weird game called dentist."  But that is another story.  Since I usually make girly things that he's not interested in, he's been asking me to make something for him.  He wants a race car.  I told him I can't sew a race car.  So, I'm hoping he'll be happy with a little monster tooth pillow.

Supplies:
Fuzzy or furry fabric for the body.  Fleece will work.
White felt for eye and tooth
Black felt for the center of the eye
White, black, and blue thread (or whatever color your body is)
Contrasting fabric for horns
Stuffing
If you want to do things right, you should use some interfacing, but I generally just use what I have for these kinds of things.  I do not usually have interfacing.  My son will not know the difference.

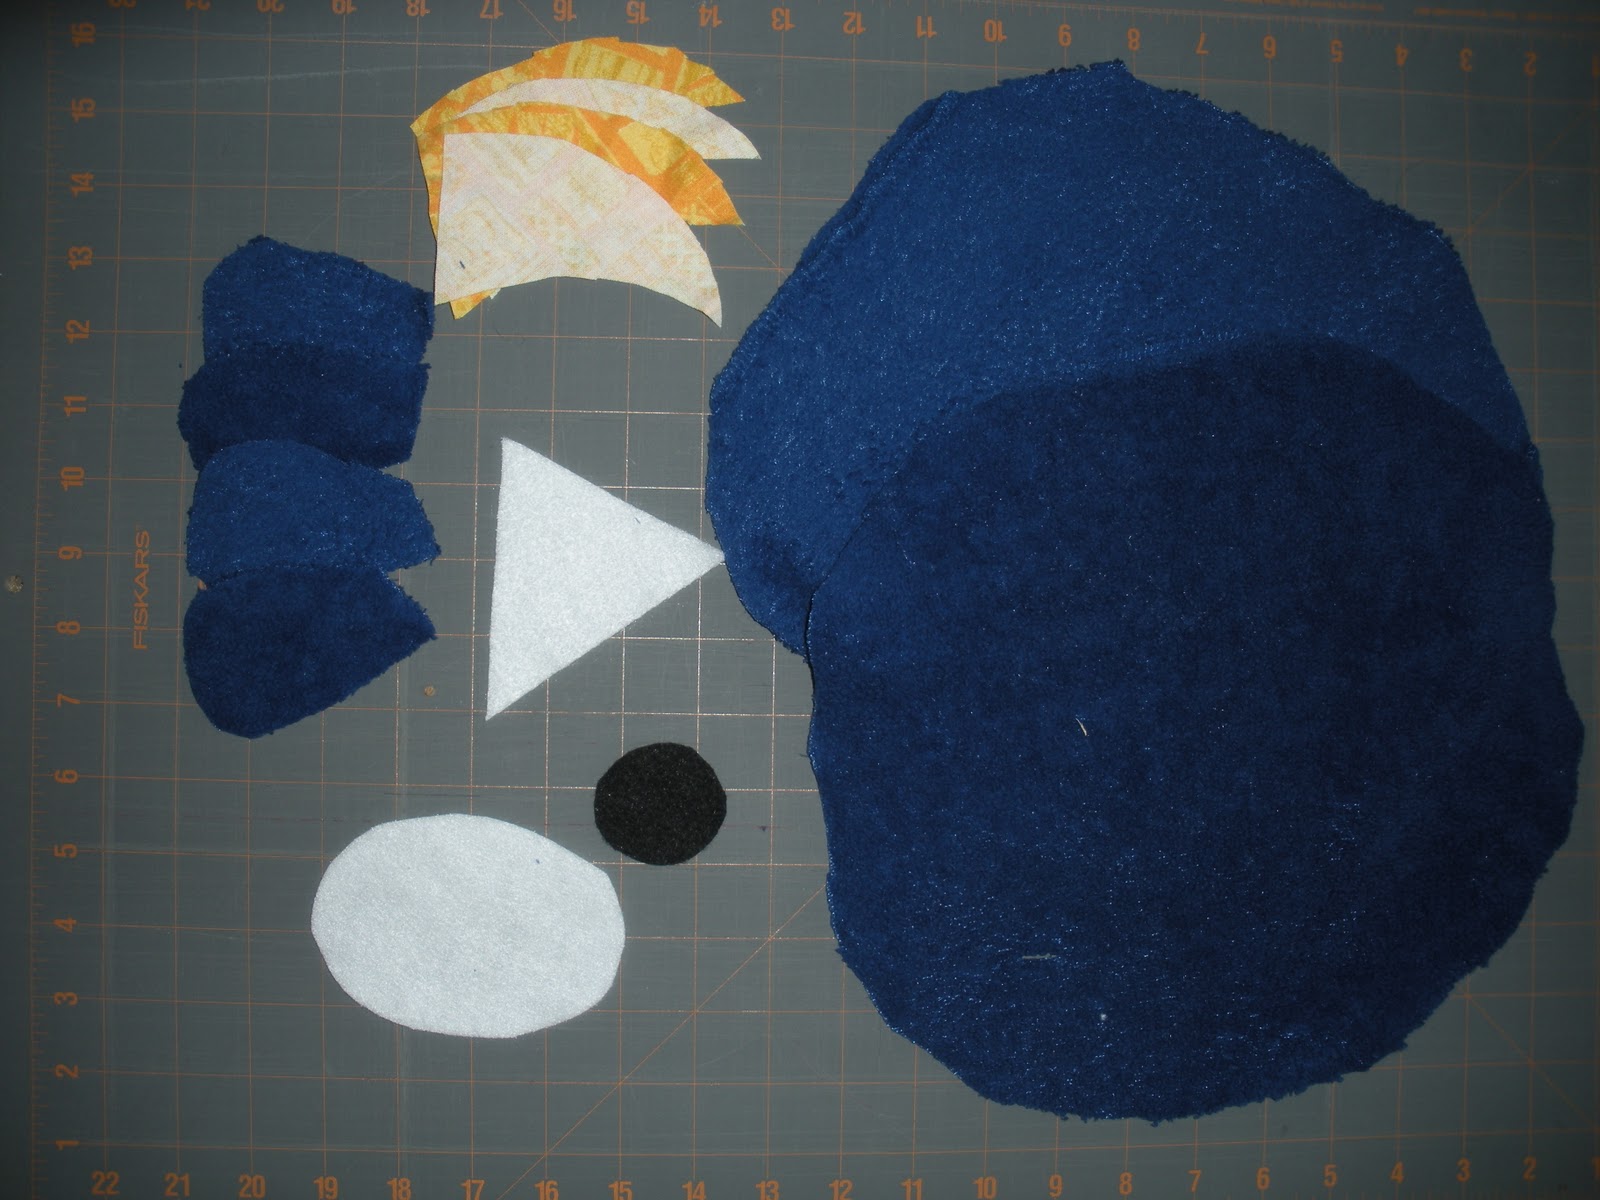
If I had some forethought, I would have made a template that I could have printed off, but I usually do things off the cuff.  Here are the pieces:
1 white oval eye
1 white triangle tooth
1 black pupil
4 horns (alternate between orientation)
4 feet
2 large oblongs shapes for body


First sew the pupil to the eye and finish the top edge of the tooth.


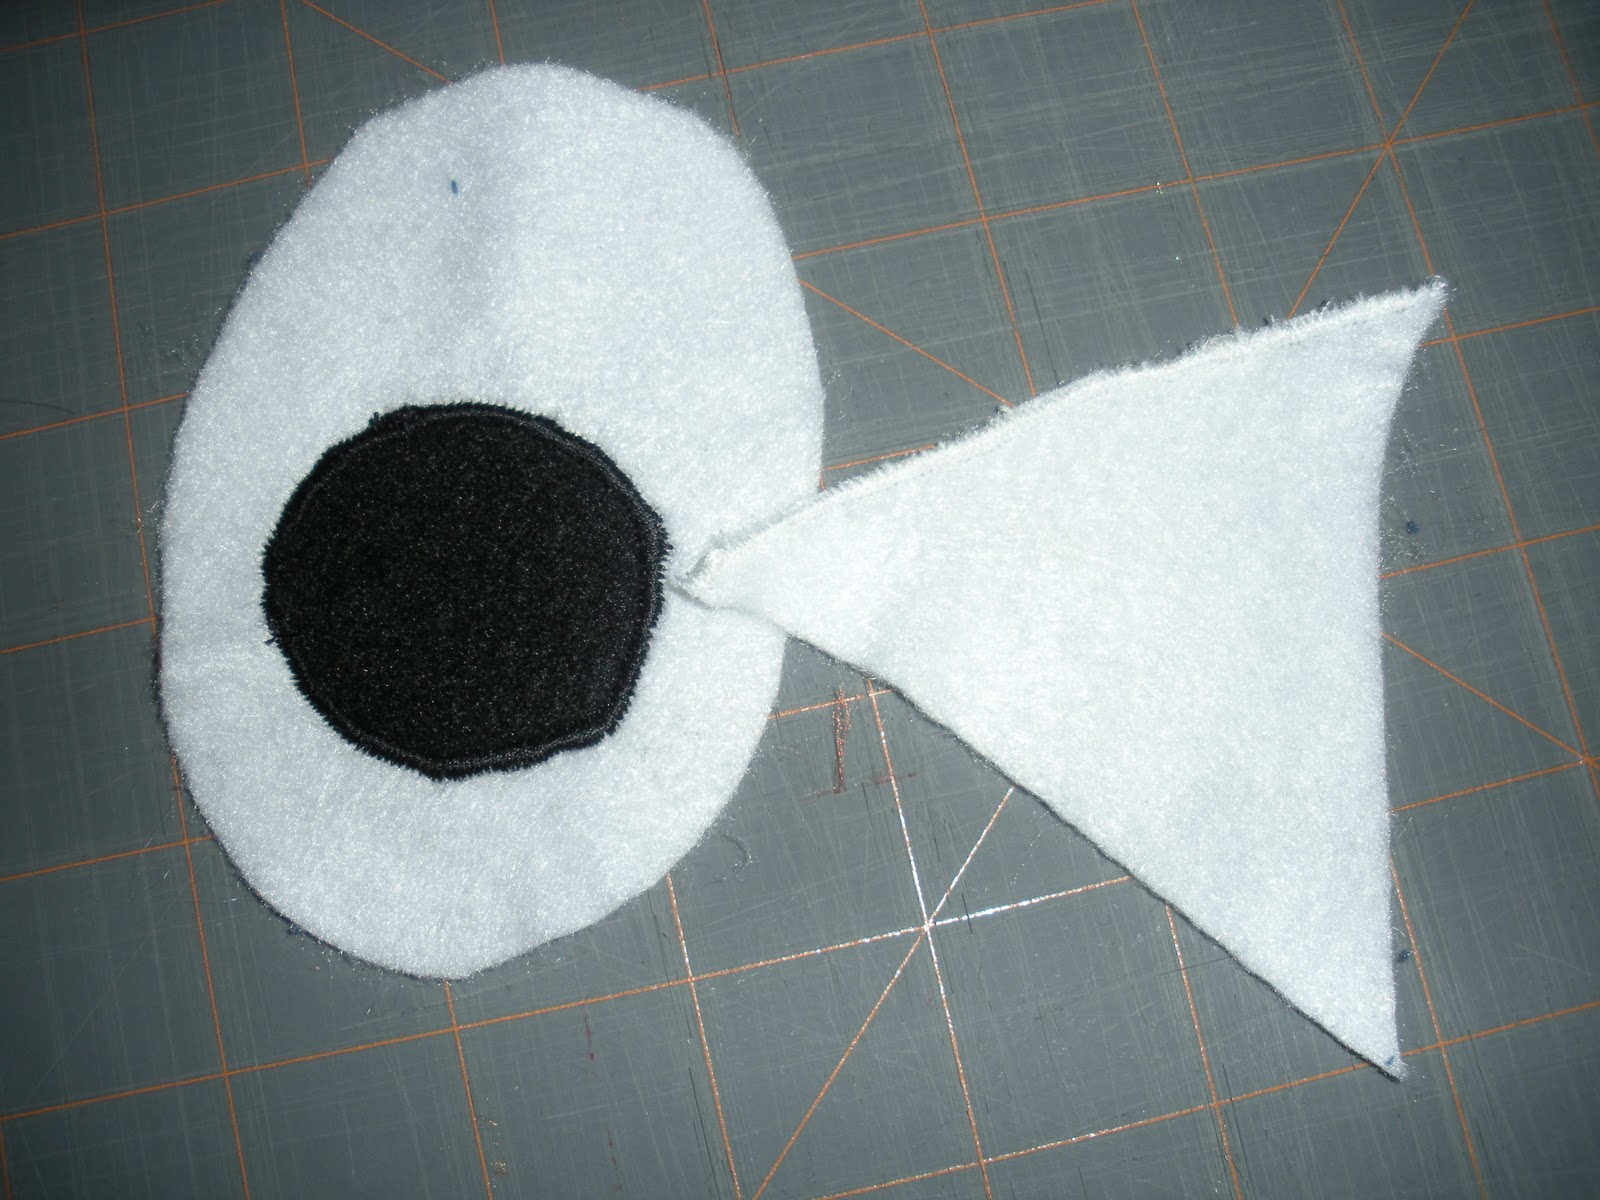
Pin the eye and tooth to the front body piece and sew together, leave a pocket at the top of the tooth.  Then sew a line for the rest of the mouth.


Sew the horns and feet together, right sides together, leaving the end that will not show open.  Cut excess from the tip of the horn.  Turn right side out and stuff.  Pin with the open edges lined up with the raw edge of the face.

Pin the front piece with the back piece, right sides together, with the horns and feet inside.  Sew together, leave a hole on the side to turn right side out.

Stuff him and sew up the hole in the side. Place a tooth in the tooth pocket, and the Tooth Fairy will replace it with some cash!


Friday, October 14, 2011

FHE Chart


I made a family home evening chart years ago with cute little paper flowers and flower pots.  The pots had our names, and the flowers had the job we had for that night.  It worked, and even though I only had one baby at the time, I made it so we could at another pot.  The chart became obsolete when we had baby number three, and even after almost three years, I hadn't made a new one.  The kids started fighting over who was the "ductor", and since family night is not about fighting, we figured it was time for a new chart.  I had a few ideas in mind when I went shopping for supplies, but then I saw this:


and I changed all my plans.  I wanted pegs, but couldn't find any (serves me right for shopping for crafts at Wal-Mart).  So, I found some cute mini clothes pins to use to hold the names in place.  I kind of like them better anyway.   

Supplies:  Wooden Background    
                Stars (or other shape) for the names
                Modge podge                 
                Paper for backgrounds (I used 10, 1 for the stars, and 9 for the squares)
                Tole Paint and finish              
                Stamps or sticker letters (unless you have really good handwriting)
                Mini Clothes Pins or pegs
                Embellishments
                Glue Gun


First, sand the wood if it needs it.  Paint and finish the background  I ended up painting the inside as well because you can see it ever so slightly between the tiles.


Then, I cut the papers to size attached the embellishments to the papers and modge podged the papers to the tiles.  Once dry, I used a glue gun to attach the mini clothes pins to the squares and the hinge on the bottom left and middle squares.


After everything was glued and dry, I glued the squares in to place.  Then I took one of my papers, cut it to the size of the stars, stamped our names on and modge podged those on to the wood stars.


 I thought it would be fun to make the hinge function so, surprise, there's a hidden door!  It's kind of hard to see in this photo,  but it says "Family Forever" on the inside.  My little girl especially likes this little door.


If you have a question about what Family Home Evening is click here.  It has a short explanation, as well as links for ideas and activities.  I also saw this turned in to a cute message board.  I just love how you can do anything with a little paper and glue!

Thursday, October 13, 2011

Burp Cloths


Don't you think Raggedy Ann and Andy make just about the cutest kids fabric??  I do, and I have for years.  Before I was even married, I bought a ton of this flannel and a little terry cloth that matched, thinking I could use it when I had kids.  I did use it a few years later when my husband and I our first baby.  He made the crib and changing table, and I made the blanket, bumpers, and the baby.  I still have a ton left, and it's just been sitting there for years.  So, I busted it out a few weeks ago, and made some burp cloths. Here's how I made them:

First cut out the flannel and terry cloth to the size you want it.  I only had a little bit of terry cloth and I wanted to make a few, so I made mine 14x9 inches.  With how much my boys spit up and my little girl drooled, I would definitely make them bigger if I had more fabric.
  

I wanted to try the rounded edge look, so I used a cd, and cut the edges with a rotary cutter.  After it's cut, place the fabric wrong sides together and pin into place.  I am not a fan of pinning. In fact, I think it's the worst part of sewing, so I can tell you how important it is because of all the unpicking I have done.


Now, sew the two pieces together at about 5/8 inch, leaving a gap at one end to turn it right side out.


Then, cut little triangles in to the rounded edge to reduce the bulk.


Turn right side out and take the something like the blunt end of your scissors, or maybe a popsicle stick along the edges to push them out where they need to be.  Top stitch, once right around the edge, and once 1/4 inch in from the edge.  Be careful to close the opening you left while you were sewing them together.


And, it's finished! 


Homemade Puppet Theater

 Aren't boxes fun toys??  I remember making a whole house out of  dishwasher and refrigerator boxes one time when I was a kid.  It was complete with drapes for the windows and shelves with decorations on them.  Ah, memories!  Well, I mentioned we have moved a couple of times in the last year, and boy to we have boxes!  We had a moving company pack us up for the trip eastward, and they used some really cool wardrobe boxes for our hanging clothes.  They're big ol things and they are really sturdy, so I decided we needed to make something cool with one.  A puppet Theater!!! This is what I started with.


 Then I turned it upside down and used the flap for the door in the back, cutting off the extra piece that wraps around to the top.

Then, I cut a hole in the front of the box, leaving  a couple of inches around the top and sides and keeping the bottom attached.  I scored where the flap attaches and a line a few inches above so I could fold them to create the stage.

To keep it in place, I just used moving tape.  I'm sure someone else could have come up with an idea that would look more appealing, but this works.

The next step was to place the background.  I used some scraps from one of my fabric boxes and just used liquid stitch to finish the edges.  I used a glue gun to put it in place. After that, it seemed like a fun idea to give it a gold trim to make if fancy.

A little curtain made the same way as the background,  some black chalkboard paint, and viola!  We have a puppet theater.  The kids and their friends all have so much fun with this! 


Wednesday, October 12, 2011

Craft Closet

I have a craft closet.  I used to work at JoAnn Fabric and Craft, and took advantage of many of their stock-up sales.  I also have a mom who crafts.  She gives me all of the things she's decided she won't get around to doing.  So, you can imagine I have well more than my fair share of fabric and craft supplies lying around.  Since starting a family, I just haven't put very much of my stock pile to use.  I've got to get it all out, and finish a project in one shot because I cannot leave anything out where the little ones can reach it. 

We recently relocated from Utah to Georgia, and had to move everything we own a couple of times.  It made me realize just how much I have, and how little I use it.  So, I have made a goal to use up some of my craft closet so the next time we move, I won't feel so guilty about the boxes and boxes of unused scrapbooking and quilting supplies.  I have done a few little things so far.  I am kind of proud of some of them, so I decided it would be kind of fun to start a new blog.  Here are some of my recent projects:


Burp cloths.  I've had this fabric since 2003.  I bought it while I was working at JoAnn's because I wanted to someday decorate my baby's room in Raggedy Ann and Andy.  Two years later, I made the crib set for our fist baby.  It was so cute!
This is one that Mom decided she didn't have time for.  It sat in my craft closet for a few months,  but then I decided to make my little girl a new dress.

The solid red on this dress are scraps from a bug quilt I made for my son.  The floral is a vintage scrap that came from one of my Grandma's hand-me-down boxes.
This is a puppet theater I made from a moving box.  The curtains, stickers, and gold paint trim all came from the good 'ol closet, but I had to go buy some black paint for the rest.  It's chalkboard paint, so the kids can write the name of the play they're doing.


This is my most recent creation.  Sad to say, I actually had to buy most of it, but I think it turned out well.  It's a Family Home Evening chart to keep track of what each of us gets to do.  The embellishments at least came from my scrapbooking box.

I have more pictures of how I made the puppet theater, burp cloths and the "FHE" chart, and I will make posts for those soon.  If anyone has some good ideas for how to use scraps of blanket fleece, those comments would be most welcome in the mean time! I have turned some in to taggsies, but I would love more ideas!